Post Content
When I started podcasting, I was unhappy with my voice popping out in my episodes. To get rid of those pesky plosives from my podcast, I purchased a pop-filter, after scoring through all the reviews on the internet. But the results didn’t seem satisfactory. My voice was still popping out. And I was worried if my money had gone down the drain. After discussing the situation with a podcaster friend, I realized that I had not set-up my pop-filter in the right manner.
Pop-filters do a great job of removing disturbances from the recording by acting as a filter between your mouth and the mic, provided you know how to set it up. This is what I learned from trial and error, and I want to share my findings with you and help you save your time.
How to Set-Up a Pop-Filter For Recording a Podcast?
The best way to set-up a pop filter is to maintain a distance of the size of your palm from the microphone. And while recording, the podcaster should be two-three inches away from the pop-filter. This placement brings out the best results from the recording process, and also makes the podcast sound natural.
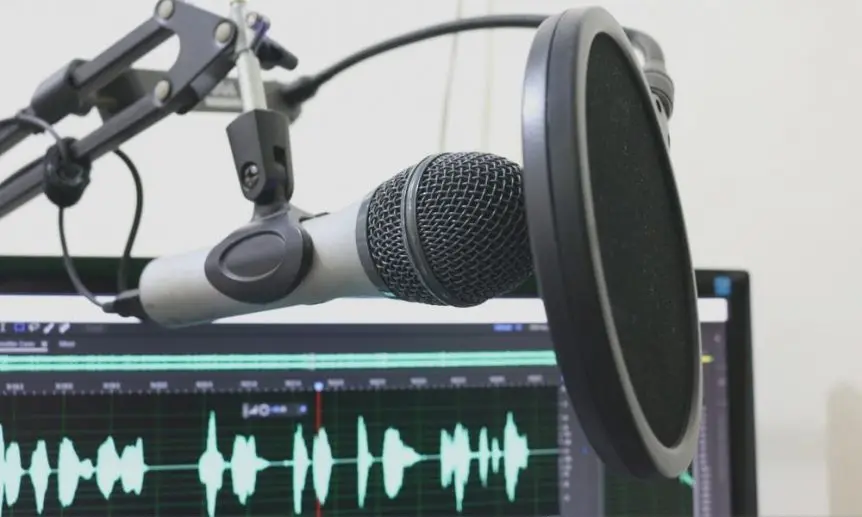
A pop filter is a simple tool that stops your voice from splitting during the podcast recording, but it’s effective only when it’s placed properly. New artists often make the mistake of keeping the pop-filter too close to the microphone. Some of you might be new to the podcasting world, and clueless about how to set-up your pop-filter in the first place. The set-up is a simple process, let me break it down for you.
Setting Up Your Pop-Filter
- Start by adjusting the clamp to an open position. For that, loosen the bolt of the pop filter.
- Place the pop filter close to the microphone, but there should be no contact between the two. Decide where exactly on your microphone stand you want to place the pop filter. Now you have to adjust the gooseneck.
- Set an angle of 2 O’clock (or 10 O’Clock) between the pop-filter and the microphone. It prevents the sound from bouncing off between the filter and the screen, and helps in reducing the plosive sounds.
- The pop-filter should never touch the microphone. However, the actual distance that you want to keep between the microphone and the pop filter depends on your personal preference. Maintain a distance between 2 to 6 inches to get rid of plosive sounds and sibilance, while getting the effects that you desire.

Is it Okay to Adjust the Pop-Filter While Recording?
While recording your podcast, make sure not to touch or move the filter from its position. You should be a few inches away from the pop-filter. The distance between you and the mic has a great impact on how your podcast recording would sound. Maintaining the same distance from the mic throughout the recording helps you achieve consistency in results, and a pop-filter, apart from performing its intended function, serves as a reference for keeping that distance.
For the same reason, I would advise you not to tamper or play around with your pop-filter in the middle of the recording. If you are an amateur, do a trial recording with your new pop-filter and equipment first. Figure out the microphone height, microphone position, pop-filter placement, and the distance where you would stand. When you are completely satisfied, do the actual recording.
If you are used to gesticulating while recording, remind yourself to keep your hands off the filter. It would be great if you check the stability of your set-up before recording. You wouldn’t want the pop-filter to move from its position after the recording.
How to Keep The Pop-filter Clean?
The pop-filter comes in close proximity to your mouth and gets exposed to your saliva when you record. If you invite guests over for your recordings, it’s trapping germs from them too. So it’s a good idea to clean the pop-filter once in a week or two. You can simply clean your nylon or metal pop-filter with soap and water, and let it dry for seventy-two hours.
Why Should You Use a Pop Filter While Recording a Podcast?
A few people might wonder if they really need a pop-filter for recording a podcast. I would like to put their doubts to rest. If you ask me, a pop-filter is a must for all voice recordings, whether it’s a podcast or song that’s being recorded.
| Double layer pop filter | Triple layer wind filter | Foam filter | |
 |  |  | |
| universal size | universal size | always buy for specific mic | |
| check price | check price | e.g. check price for Blue Yeti filter |
Pop-filter Eliminates Plosives
One of the primary reasons why podcasters use pop-filter while recording is to achieve a recording that is free from annoying plosives. If you are a newbie and wondering what’s the whole fuss behind plosives, then here is a quick explanation for you. When an artist pronounces certain heavy breath consonants into a microphone, the high air pressure causes the voice to become windy or pop-out. The resulting sound is commonly goes by the name of plosives, and it can be easily filtered out by using a pop-filter. If you think of it, that’s why there are called ‘pop-filters’!
Plosives are quite directional in nature and happen when you speak consonants like Ba or Pa directly into the microphone. When there is a pop-filter between your mouth and the mic, the filter screen absorbs and scatters the sound before it reaches the mic. This mechanism prevents plosive from getting recorded in your podcast.
Pop-filter Reduces Sibilance
Sibilance is the hissing sound that comes when a word or sentence contains a close repetition of ‘ss’ sounds. Sibilance also happens with the sound ‘sh’ and ‘z’. What makes sibilance painful to the ears is it’s a high-frequency component. It is a natural aspect of human speech, but it gets magnified and sounds irritating on the recording.
Pop-filters do not eliminate sibilance but can help bring it down to some extent. This saves the time that would otherwise go into editing and removing the sibilance.
Easy cleaning
The pop-filter also does a great job of saving your mic from the moisture that would otherwise land on its surface from your mouth while you record. This is not just great for keeping things hygienic, but also adds years to the life of your microphone.
Things to look for while buying a pop filter
Gooseneck Quality
You wouldn’t want to have a pop-filter that droops down while you are recording your podcast. It would be plain too annoying to fix it back while focussing on your podcast script, and it might not be great for your recording. Make sure that the gooseneck is long, flexible, and stable so that you don’t have trouble placing it to the desired location, and it stays where you left it!
Size/ Diameter
The standard size for pop-filters is six inches. The bigger your filter is, the more room you have to move around or express your body language while recording your podcast. Remember that bigger pop-filters are heavier and they could pull down your mic stand, so it’s better to use them with heavy and durable mics rather than smaller ones.
You can also opt for a smaller pop-filter that has a four-inch diameter. They are light-weight, which makes them suitable for carrying them to different locations. And they work quite well with smaller microphones or recording areas with limited spaces.
Mount
Most pop-filters come equipped with mechanisms to mount and clamp that is compatible with the commonly used microphone stands. If you happen to use a desk-mounted microphone, you need to look for a pop-filter that you can clip to the mic directly, or to the desk.
Screen Material
Some screens are made of fabric (like nylon). Such filters are less expensive and work fine- they happen to be the common choice of voice artists and recording studios. Some artists find the sound that’s recorded through a nylon filter to be quite vintage as well. But nylon filters are tough to clean, and they can get easily damaged.
There are other pop-filters made of woven or perforated mesh. They give an enhanced clarity in higher frequencies. This gives the recorded sound a modern edge. Metal pop-filters can be easily cleaned, and they are quite durable. They are a bit more expensive, but their long lifespans make them worth every penny.
Both the kinds are used by professionals as well as amateurs. So make your pick based on the desired effect, and the money you are willing to spend.
Do all microphones require a pop-filter?
All microphones require some form of filter to help you to get a better audio quality, but you don’t need to add an externally mounted pop-filter to all mics.
Some mics sound great with a foam filter that comes with the mic itself, provided by the producer, e.g.:
- Shure SM7B (check current price), the best dynamic XLR recording mic, comes with a state of the art foam filter,
- Shure MV7 (check current price), the best USB mic, also comes with a fantastic foam filter.
Summary
If you want to amaze your listeners, you have to learn about the subtle nuances of voice recording. And setting up your equipment correctly is one such seemingly small thing that impacts your result. Regardless of the money that you have spent on the recording gear, you must understand its correct installation to get a flawless recording.
One such tiny detail that podcasters often overlook is the right set-up of their pop-filter. Don’t let your carelessness get the better of you. Learn the correct installation of pop-filter before you actually start recording; it will really help bring finesse to your work.