Post Content
Below you can find 19 effective voice tips to make your podcast sound professionally. We classify them into general categories:
- Location – choosing, soundproofing, improving acoustics
- Equipment – microphones, headphones, stand, filters, maintenance
- Technical – setup, recording, editing
- Vocals – voice technique
Below you will find a list of technical tips to keep the quality of your recorded audio consistently strong throughout all your episodes. The goal here is to help you to understand the process of recording great audio quality without having access to a professional studio and sound engineer.
1. Maintain a consistent recording environment
The idea of a professional studio is to have a quiet room, without external sounds arriving and being recorded by your microphone. It also captures the voice you are emitting and absorbs it so again your microphone won’t record it. As studios meet those requirements they can guarantee good quality but in this case most important, the constant and repeatable quality of your recordings.
So when working on your podcast you should also maintain the similar quality of your episodes. If you are creating a home studio make sure you always meet the same conditions for each recording session.
- Use the same room.
- Create a checklist of activities you do to disable background noises.
- Maintain the same setup for all your equipment (microphone, stand, filters, preamp)
- Note the time of your recording – so the streets surrounding your home will generate similar noise pollution.
- Don’t have unnecessary objects and electrical devices around your microphone creating strange acoustic effects.
By maintaining a consistent environment and procedures you’re better able to match the audio quality. Be consistent for every time you record, for every new episode and even more importantly for re-recording of a piece of material.
2. Choose a good quality microphone
If you make a wrong purchase here you are facing:
- Low recorded sound quality and captured background noises
- Additional hours required to spend in the editing software
- Poor satisfaction and frustration for you as a creator
- The necessity to upgrade – once you realize it’s simpler and cheaper to have a better microphone
Choose the right microphone from the start and save yourself a lot of struggles and focus on the content. When buying consider:
- Quality – correct microphone for podcasting should be dynamic, balanced, warm and enable you to record top-quality audio
- Capabilities – you want it to flexible (mount it on different types of stands), durable (some mics might be very delicate to operate), quiet, shielded from electromagnetic interferences
- Future potential – don’t save money on poor quality equipment, choose something which will serve you for years without a need to upgrade
- Price – choose a mic which will justify the quality with a spend. You can find great equipment in the $100-$400 price range
- Location of recording – consider if you are recording in a studio quality room, noisy location or on the road and you don’t control your location at all
- Portability – if you travel a lot a record on the road you will require different device than if you record from the soundproofed homemade studio
Our favorite two choices for podcasting are affordable condenser mic Rode NT-1 A (check current price) and mid-range priced Shure SM7B (check current price). Both of those podcasting microphones will solve many of your audio problems just with the quality they provide right out of the box.
Check out our very detailed article on podcasting microphone selection: Choosing a Microphone for Podcasting – Buyers Guide and Recommendations.
3. Protect your microphone
You need to take good care of your microphone. Once you already have invested in this vital piece of equipment for your podcast you have to be aware that they can be damaged and their quality of sound may deteriorate.
- Moisture and temperature may impact the more sensitive and expensive microphones. Here dynamic microphones are more resistant but if you want your mic to serve you for years you should take care of it.
- Mechanical damage – be especially careful with condenser mics as they are more fragile. Dynamic microphones have stronger diaphragms and overall design. Condenser microphones have a higher chance of being damaged when you drop them.
To avoid risks simply put it into the box when you finish recording. This will protect your microphone from mechanical damage and environmental factors.
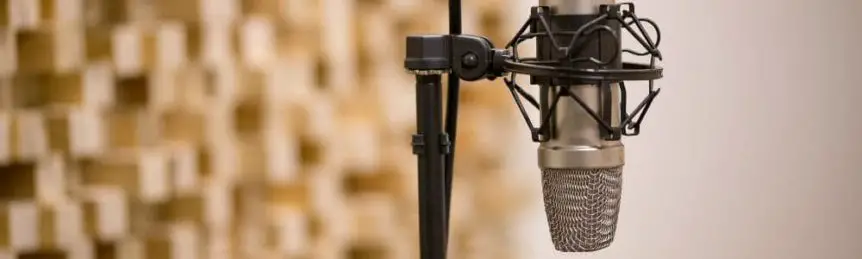
4. Use a floor-based mic stand and a shock mount
Keep your microphone stationary and shielded from vibrations. You should never hold onto a mic when you are recording. Key problems it generates are:
- If you wear any jewelry rings they will make inevitably clinking sounds and they will get captured by your microphone. Additionally, some people may simply automatically tap their fingers on the microphone.
- Loudness level will be constantly shifting as the distance from your mouth to the microphone constantly changes as you move back and forth.and not in a desired and controlled way.
- Movement of the microphone may create additional mechanical sounds. If you don’t use a shock mount floor vibrations may be transmitted through your stand and captured by your mic.
- Plus you increase the probability of dropping and damaging your precious equipment.
Using a microphone stand gives an immediate boost to the quality of your podcast. A stand will eliminate the noises you make when you touch the microphone and will help you to keep the same distance from your mic to your mouth. Using a shock mount will eliminate the additional problem of mechanically transmitted noise.
You need to have a stand. Overall we recommend a floor-based mic stands instead of a desk stand. By touching and leaning on the desk you will create low-frequency vibrations that will travel to your mic and get captured. You can have a floor-based stand whether you record standing or sitting down. If you are not convinced to recording standing have at least a desk stand.
Also, some mics come prepackaged with simple shock mounts so take advantage of what you have already paid for.
5. Use applicable external filters – foam-filter or a pop-filter (windscreen)
Use as applicable – if your device came with a foam-filter or a pop-filter apply them during each recording session. If you don’t have one purchase as soon as possible. You will need at least one type of filter.
What they do is they shield the microphone from:
- Plosive consonants – formed by completely stopping airflow, building up the pressure and the release of extra bursts of air (also known as popping). Those stop sounds can be voiceless, like the sounds /p/, /t/, and /k/, or voiced, like /b/, /d/, and /g/.
- Sibilance – is an acoustic characteristic of some consonants made by focusing the stream of air more intensely, resulting in a high pitch. Sibilants have a characteristically intense sound and often accompany the sounds /s/, /z/, and /f/.
- Also, a pop-filter creates a barrier between you and your device and protects your recording from speaking to close to the mic.
Don’t waste time later working on editing, simply avoid recording those in the first place. Spending just $10 on a pop-filter will improve your podcast quality and save you a lot of time.
6. Record with headphones – monitor the sound
This is simply controlling and preventative action. You should plug your headphones and hear exactly what is being recorded. You have to make sure the recorded voice is loud enough and check if there aren’t too many background noises. If there are try to locate the sound source and eliminate it.
Use the best-quality headphones you have for the truest results. Good headphones should be will fit and prevent from sound leaking into the microphone and causing additional interferences.
Check out our very detailed article on podcasting headphones selection: Best Podcast Headphones – Detailed Guide & Recommendations.
7. Maintain correct technical setup for the recording
Having a correct technical setup of your equipment is very important. Setup and monitor those crucial parameters before a recording session:
- Peak – don’t ever peak above 0db or higher. It creates audio distortion which is very difficult to edit. Until you get more experience try to peak at or below -3dB. If you have trouble with this setup consider using an input limiter.
- Measure your noise floor (signal created from the sum of all the unwanted audio noises) and set the correct parameter. It would be best if you could have a noise floor at or below -60dB.
- Keep audio levels around -10 to -12dB. Your quietest recorded audio to should be kept well above the noise floor, maximizing the signal-to-noise ratio.
File format – record the best quality by saving file with correct parameters:
- Save in an uncompressed .wav file format, guaranteeing no quality loss.
- When doing a simple voice over the podcast, without the need to have different audio in different stereo channels use a mono channel to record.
- Record in sample rate of 44,100 Hz.
- For best quality use a bit depth of 24 bits. This will result in a higher bit rate (kbps) and larger file sizes of 465MB vs if you would record in 16 bits.
- Take note in the table below that for stereo channels you require twice as much storage for your recordings.
| Bit Depth (bit) | Channel | Sample Rate (kHz) | Bit Rate (kbps) | 60 min file size (MB) |
| 16 | mono | 44.1 | 705.6 | 310 |
| 24 | mono | 44.1 | 1058.4 | 465 |
| 32 | mono | 44.1 | 1411.2 | 620 |
| 16 | stereo | 44.1 | 1411.2 | 620 |
| 24 | stereo | 44.1 | 2116.8 | 930 |
| 32 | stereo | 44.1 | 2822.4 | 1240 |
Last but not least is the correct microphone positioning.
- Distance – Record 6 to 10 inches (15-25 cm) away from the mic. You can find the distance which works best for you but this is the best place to start an experiment. Put pop-filter between your microphone and your mouth.
- Position – put the microphone in front of your nose and then move it slightly up and to the right/left. A starting point is to imagine two 90° arcs starting at your nose and one going towards your ear and second towards the top of your head. Put your microphone in 1/3 of the arc moving towards your ear and towards the top of your head. Later you can experiment and try to compare when precisely your voice sounds best. Different mike may require different setup to find the best spot. Some dynamic mics with lower sensitivity may require you talking directly into them. Test out different positions.
Don’t record in mp3. Before publishing your file to podcast directories you will format it and save in mp3 format but this is the final step before publishing.
Save all of your presets for each recording session. This is important if you will need to go back and re-record some part of your episode or simply if when you will want to recreate the sound you had on some particular episode.
Read more about technical parameters of recording in our article – 17 useful microphone setup tips for pro audio
8. Have a good podcast editing software
You need good software with user interface and capabilities designed for professional podcast productions. Good software will help you to clean up the recording, optimize audio volume and use good quality of audio compression before you make it ready for publishing.
At the end the amount of time you will need to spend in your editor will depend greatly from a few factors:
- Background noises that you were not able to eliminate prior to the recording.
- Effects you want to insert into the final episode.
- Amount of cuts and rearrangements you want to have in the materials and amount of tries certain elements required.
- Your speaking technique. Professional voice over artist is able to provide nearly a perfect read, which will require only slight editing. As you develop and speak more fluently and naturally the time spent on editing should reduce.
- Your guest (if you have one) speaking technique and habits. Depending on your guest this part may require some extensive work. People when speaking naturally put “Um’s” and “Ah’s” when they give themselves time to think about what they are going to say next. You need to remove this to make the interview sound more fluid and be more pleasant to listeners ears.
We especially recommend Hindenburg Journalist (paid, supreme quality, dedicated to podcasts) and Adobe Audition (paid, premium professional software).
If you just starting out and want to experiment try free Audacity. But if you are thinking seriously about podcasting then from perspectives of quality, ease of use, time savings you will be soon looking for more capabilities and flexibility.
Check out more details about Hindenburg, Adobe Audition, Audacity and what makes them as good as they are in our articles: Best Podcast Editing Software – detailed recommendations
9. Read your script from a tablet
For needing your script or notes for a recording session the best way is to access it with a tablet:
- Smartphone – is better than paper in terms of generating noise but the small screen doesn’t allow to put a lot on it and it might be distracting when you scroll through text.
- The table has all the necessary qualities – it has a big enough screen to show you a lot of material at once so you want to have to pause too often. It is silent and doesn’t generate noise. To further improve the benefits of tablet:
- You can use a rubber pad to avoid additional noises.
- Disable auto lock screen for the time of your recording session to avoid distraction and sound.
- Use do not disturb mode to disable notifications.
- Paper – turning pages or simply just moving them generates noise. If you decide to go for a page written script follow those guidelines to minimize noise
- Have a book or note stand to hold your script still
- Keep one section of your episode to one page to avoid turning pages amidst longer monologues. Plan for breaks and pauses in your script – this will be a time to turn the page and it makes for a simple edit.
10. Stand while recording
Practice recording your podcast while standing. At first, this may feel a bit unnatural, but with practice, you will definitely see the progress and improvement to your audio as your voice reaches its full potential. There are multiple benefits of standing impacting the quality of your voice.
- Increased breath capacity – with greater chest expansion (not achievable while sitting) you have more air and you are able to record longer phrases.
- Lowered breath – while you keep your chest up you are able to take low breaths with your diaphragm, avoiding running out of air and taking does deep breaths which you will later need to edit.
- Released muscle tension – many people will feel stressed out when recording. The free-standing position encourages the whole body to relax as you have nothing to lean against.
- Improved air flow – as you stand up, with your microphone located above your mouth you will naturally expand your neck in the direction of the mic. This straight neck opens the space that houses your vocal cords. In turn, this will allow for unobstructed airflow through your vocal cords.
By practicing standing narration for your podcast you will make your voice sound more clean and natural, you will be able to deliver longer lines of text and decrease the noises deep breathing emits. In the end, this will improve your quality and reduce the amount of time required for editing.
11. Recording location
You are going to want to pick a location that has the least amount of background noise or the one which will be easiest to soundproof.
Review the available location from the perspective of the lease amount of noises:
- outside noises – neighbors, traffic, animals (birds), weather (wind & rain), plumbing.
- inside noises – computer fans, air condition, or any other noisy equipment.
Size of the room and building material:
- In general, go with the largest room available.
- The high ceiling is better for acoustics than the low ceiling.
- Floor – hard surface such as concrete, or hardwood is ideal.
- Windows – glass gives a lot of vibrations. Avoid rooms with too many windows if you won’t be able to cover them with heavier curtains.
- Walls – hard walls from a brick of concrete are better than popular drywall.
- Also, asymmetrical walls and other irregular surfaces would be a nice thing to have.

You want to find a room which naturally will have
- Least amount of reflection – caused by corners of your rooms, connections between walls and by large homogenous flat surfaces like windows, tiles, large naked walls
- A considerate amount of absorption – overall you are looking for a room with a high level of absorption. You don’t want your mic to be able to capture a lot of reverb. In your home clothing, drapes, sofas and furniture covered with fabric work as absorbers.
- Decent amount of diffusion – the more irregular angles, shapes, and rugged surfaces has your room the chances are it will better diffuse some of the emitted sounds.
Learn more about room acoustics in this guide: Podcasting room acoustics – how your room impacts your audio quality?
12. Soundproof your room and improve acoustics
The process of soundproofing means you are actively trying to prevent noises to be captured by your microphone. You need to take care of:
- Internal sound sources – avoid noise sources generated by your devices including: computer, air condition, heating system, fridge, etc. Put your microphone as far from those devices as possible. Try to turn them off for the duration of the recording session.
- External sound sources – think how busy is your neighborhood and at what times of the day? In my location usually outside noises start to increase as people start traveling to work around 8 am, during the summer when children play outside it is usually noisy between 2 pm and even 8 pm. For me, the best time to record is early in the morning or late in the afternoon.
Regardless of this, you should consider implementing simple solutions like:
- adding mass to walls to prevent vibrations and sound pouring in from the outside,
- dampening the sound with a noiseproofing compound,
- decoupling large surfaces and furniture thus blocking the transfer of vibrations,
- sealing the gaps – around windows, doors and air electrical outlets also preventing noises coming from inside of your house.
- Absorption of reflected sound – in the very room you will be recording you have to most worry about reflected sound from:
- Corners of the room (where 3 surfaces meet) – avoid rooms with too many open corners as they will generate the most amount of distortions and may be most difficult to cover with home methods without buying bass traps.
- Places where walls connect (where 2 surfaces meet) – similar to corners; try to avoid too many open and reflective connections.
- Large reflective surfaces – those you can always cover DIY style with large bedsheets and blankets.
- Diffusion – is the technique of leaving a bit of sound in the room and controllably dispersing it. Since we don’t live in soundproofed world complete removal of all the sound absorptions creates this uncomfortable feeling of “dead” silence. Hence actually having a very low but natural level of distortions is more natural.
We have a dedicated article about all the steps to take to soundproof a room: silent home podcast studio.
13. Shield your mic from unwanted sound
| Mobile isolation | Small size | Large size | |
 |  |  | |
| Dimensions when unfolded | 13.3″ x 13″ x 12.2″ 34 cm x 33 cm x 31 cm | 12.6″ x 11.8″ x 4.7″ 32 cm x 30 cm x 12 cm | 23.5″ x 15.4″ x 11.0″ 60 cm x 39 x 28 cm |
| Weight | 1.99 lbs (0.9 kg) | 3.5 lbs (1.6 kg) | 11.4 lbs (5.2 kg) |
| check price | check price | check price |
If soundproofing is challenging for you to try to at least do two things:
- Islote the back of the microphone – with either a portable sound booth or an isolation shield. This is not a perfect solution but is definitely improving quality. Going with a portable sound booth can be also good if you are podcasting from different locations. As for DIY solutions here be very careful not to create an echo-chamber if you use a plastic bin and low-quality foam without any isolation properties.
- Isolate the wall behind your back – as this wall is front facing the most sensitive part microphone try to cover this wall with solid sound absorbing material.
14. Never record with music on
This is a bit of simple advice. Don’t record with music playing in the background:
- If you will need to cut a part of the recording it will be annoyingly noticeable.
- When you will need to rearrange the material you will deliver even more jumps in the background music.
- If you want to re-record a part of your episode you won’t be able to time the music to avoid jumps.
When music is important for your podcast simply add it during editing.
15. Don’t create background noises for your microphone to pick up
Don’t be your own enemy. When recording:
- Don’t wear jewelry – rings, earrings, bracelets, pendants all can create noises,
- Don’t wear hard shoes which could loudly stamp.
- Wear soft fabric clothing so it won’t brush against itself.
- Wear simple clothing – avoid extra buttons and noisy decorations.
16. Warm up your vocals before recording
Regarding warm up there are two approaches you can try:
- Record the first few paragraphs two or three times in the beginning.
- Re-record the first few paragraphs at the end before the end of your podcast episode.
Both approaches have the goal of having the beginning recorded as your voice is warmed up. However, using the second approach can bring additional dynamics and excitement to your voice after you already have read the entire script and are more invested in the topic you want to talk about.
17. Protect your voice on a daily basis
Absolute tips important for everyone:
- 24 hours before recording avoid giving large presentations, speaking loudly in public, drinking too much alcohol and partying – don’t wear out your vocal cords. Prepare for your recording session.
- Drink clean, room temperature water (on one hand avoid too hot drinks and on the other refrain from eating ice) to avoid a negative impact on your cords. Water soothes the vocal cords and opens up the esophagus. Ice water can tighten the vocal cords so avoid it for the time of the recording.
- If you are sick or taking some medicine long term to consult the impact of the ingredients on your voice. Both prescription drugs and over-the-counter substances can have a deteriorating effect.
There are many other beverages which may impact the sound of your voice but don’t have. There are no conclusive proofs and many people enjoy those drinks without any repercussions. But if you find yourself sounding poorly, consider eliminating those drinks from your menu for some time and observe the results. Most famous drinks which can have a negative impact are:
- Coffee – it is dehydrating in its nature. Drinking it the day of your recording may have a negative effect.
- Milk – it coats your vocal cords and creates a dull sound.
- Dairy products – can contribute to excess mucus that may cause problems.
- Carbonated beverages – can have a negative impact you’re prone to reflux. Soda is known to aggravate it, and gastric juices can temporarily damage soft tissue like vocal cords.
Check more vocal tips in our article: vocal tips for Podcasters to get more listeners (the best thing about vocal tips is you can implement most of them for free).
18. Record samples of ambient noise
This technical tip is important for your editing software and the noise removal tool. In order to have the highest quality of background noise removal, you need to provide you software with a sample of just the ambient noise to analyze and filter it out correctly later. Depending on how long your recording session is, how noisy is your environment and how much the noises change during your session you can consider recording up to three, 30 seconds long samples:
- at the beginning,
- in the middle of an episode,
- at the end of an episode.
This way if the noise level will change during your recording session you will give yourself more options to correctly fix your episode.
19. Use soundtrack wisely
If you have challenges with editing background noises consider hiding them with a soundtrack or an effect. Don’t make the music too loud, just enough to cover the irritating ambient noise and not distracting from your narration. Just make sure you are using music samples that you are legally allowed to use (read more about this in Types of music you can play on your podcast).
- Make sure you have rights to the audio track you want to use. Check if the site and track have Creative Commons License agreements
- When covering ambient noise under your narration use music rather than a song with lyrics.
- If you have a problem with short lasting external disturbance consider using a shorter effect rather then longer clip. The effect can be potentially a bit louder covering up a bigger disturbance.
- There are multiple sites offering a lot of free resources for you to use for your podcast. Most popular with large easily accessible libraries are:
- ccMixter
- Freesound
- Opsound
- Free Music Archive
Before using a sound from those sites just double check if the particular clip you are interested in is really licensed under Creative Commons
- If free samples won’t meet your need there are quality royalty-free music providers. Here are some of our favorites we use and recommend:
| TOP | Best Music Source | Ideal for whom? |
|---|---|---|
1 |  | Soundstripe has the highest quality, exclusive music. |
2 |  | HookSounds offers modern, stylish and distinctive music. |
3 |  | PremiumBeat is one of the oldest and largest royalty-free music providers. |
- If you decide to cover noise with soundtrack make it feel natural. Try to match the tone of the clip to speed of speech and emotions you are trying to convey. Also to make it feel more natural try using soundtrack in few places of the episode to make it a more integral part of your podcast instead of just covering one problem.
Have your own library of effects. As competition in the field of podcasting grows larger, a big portion of authors will aim in using freely available soundtracks and effects under the Creative Commons license agreement. Popular background noises will be used more and more often so consider being unique and working on your own collection of interesting effects and background noises.
Comments 4
Howdy! Someone in my Facebook group shared this site with us so I came to take a look. I’m definitely enjoying the information. I’m book-marking and will be tweeting this to my followers! Outstanding blog and fantastic design and style.
Thanks for those tips. Quite useful. I will try to test them starting next week.
Awesome! I think now I know why sometimes I sound poorly. Thanks for this post!
Hello. This article was really useful, particularly because I was investigating this issue for my work.